Tea set blog post

Artists create original art

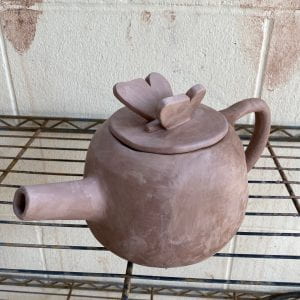
The main part of my tea set that I used all my own idea for was my tea pot. Specifically, the lid. When I first started doing my lid I didn’t know how I wanted to do this. My theme has to do with butterflies and I knew I wanted to make wings come off a certain part of my tea set. That’s when I got the idea of making wings come off the top as the knob of the lid.

I did use different sources for inspiration. I thought of my theme very late so I went straight to google and searched up butterfly themed tea sets. That’s where I got the idea of how I’m going to paint the butterfly’s around the tea pot. In some pictures I saw how they would put them coming off the sides that’s where I got my idea that I mentioned above. I made the wings come off the top. The way I am going to incorporate the butterflies into this tea set is going to be based off ideas I’ve gotten from things I’ve seen online.

Artists take risks 

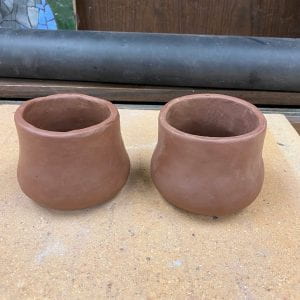
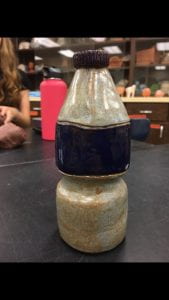
Something I tried in this project that I wasn’t sure about was the wider bottomed tea cups. I was worried about this because I’ve never done anything like that before. My main concerns was if the clay would just rip open and how much it would crack because I knew that was bound to happen. I hoped my idea would work because I had no clue what else i wanted.

What I learned from doing this is that it’s honestly a hard thing to do. The cracking and breaking was as bad as I thought it would be. When pushing it from the inside it would tear open and crack. To fix it it would take a lot of clay, water and smoothing. Even then, when it dried the cracks would reappear. I did end up fixing it in the end but it was annoying to deal with. It seemed whatever I did didn’t really help.

Wheel blog post

Artists take risks

Something I tried using in this project that I wasn’t so sure about was the stone wear clay. On the wheel we had used that kinda of clay to build. I wasn’t sure about this because I had only used the red clay before. I didn’t know if it would build differently or if it would be easier.

From using this clay I learned that I liked it better. The stone wear clay is easier to work with because of how soft it was. I remember one day in specific that the clay was hard and making a cylinder was almost impossible. The softer the clay was the easier it was to work with for me. Overall. this clay is just much smoother and I like the white look to it.

Artists develop art making skills

New processes I have learned while working on the wheel was pretty much just how to work on the wheel. Last year I barley worked on the wheel and when I did I didn’t know how to properly do it. This was basically a new thing for me. I went into it not doing it to well so I asked Mrs. A for help and ever since then I did very well. Unfortunately, I asked for help kinda of late.

Asking for help increased my skill tremendously. After I did that I was able to shape, raise, and even out my pots while making them. Without asking for help I would have gotten no where. I knew all the steps to be able to make a cylinder.

Blog post #5

Artists take risks

With my book for the media center project a new thing I tired was putting small supporting slabs in the middle and the sides of my book. I had to do this because i couldn’t just make it like a brick because it would’ve been to heavy and it most likely exploded in the kiln. I wasn’t sure about this because I have never done something like this before and have never have had to put supporting slabs into my project before.

After I completed building this I learned that is a very good technique for building models of things that might be to heavy or having the same problem as mine.  Something else I learned is I shouldn’t be worried about new things I try when it comes to building. If when I go over it with the teacher and it sounds good with them I shouldn’t stress about it. With enough smoothing and time anything can really get done.

Artists use materials and tools in an appropriate and safe way

The way I use and maintain tools and equipment to make my artwork depends on my piece. Of course different things you do requires different tools. With my book I used the serrated scrapper, rubber rid, the modeling tool with the eraser, and spray bottle. I used the serrated scrapper to put all the different parts together by scoring the ends of the parts, and to scrap off pieces that weren’t even. Next, I used the rubber rid and spray bottle to smooth out the whole book. These two things work amazing to smooth. Lastly I used the modeling eraser tool to smooth out small cracks that I cant do with my finger.

I store these materials in the proper bins they go in according to our table. The book was stored in different ways until put together. Some parts I had to make sure dried enough to stay put and have strong walls and then some other parts needed to be very wet to hold things together. Some things were stored in plastic bags some in a plastic box.

Blog post #4

Observation

  • I think I measured the original and my work very well. While I was making it I made sure every thing was around an inch bigger then the original so that when it shrank in the kiln it would be almost the same size.
  • I had to pay a lot of attention to every part so I would say the amount of effort I put into it stayed the same. The whole bottle is different sizes and has a lot of curves so I had to make sure it all was consistent.

Develop Craft 

  • The two main techniques I used to make my bottle was slabbing and many different smoothing techniques. Smoothing was the main thing I had to focus on doing because through out making the bottle it became uneven.

First, I started off by making a lot of slabs to start putting my bottle together. I had to measure and cut out each one to make sure it would be exactly like the original. I built it from top to bottom. Once I had all the slabs how i wanted I had to make coils to make sure the bottle would stay stable and more steady. Lastly, once I had the form I had to start smoothing. At first the bottle was very uneven and needed a lot of smoothing. That was what took up most of the time because it needed a lot of work.

Problem Solving

  • Putting all the pieces and coils together and sure it was all smooth at the end was the hardest part of making the bottle. A lot of smoothing shaving off pieces of the clay needed to be done for it to come together. It was time consuming by little by little it came together.
  • I had to test out a lot of different tools and techniques to make sure my bottle was all consistent and there were no bumps and uneven curves left. I also found new easy ways to smooth out large areas of clay.